Shopify how to change shipping price - 2025 Guide
Learn how to adjust shipping prices in your Shopify store with our step-by-step guide. We cover everything you need to know about Shopify's shipping options

Changing shipping prices in your Shopify store is an essential part of managing your eCommerce business. Whether you're adjusting rates due to increased shipping costs, offering promotions, or simply optimizing your store for different regions, it's important to have control over how much you charge for shipping. In this guide, we'll walk you through the process of updating your shipping prices in Shopify, helping you set up accurate and cost-effective shipping options for your customers. Let's dive into how you can easily update your shipping rates to suit your business needs!
How to change shipping prices - Step by step guide
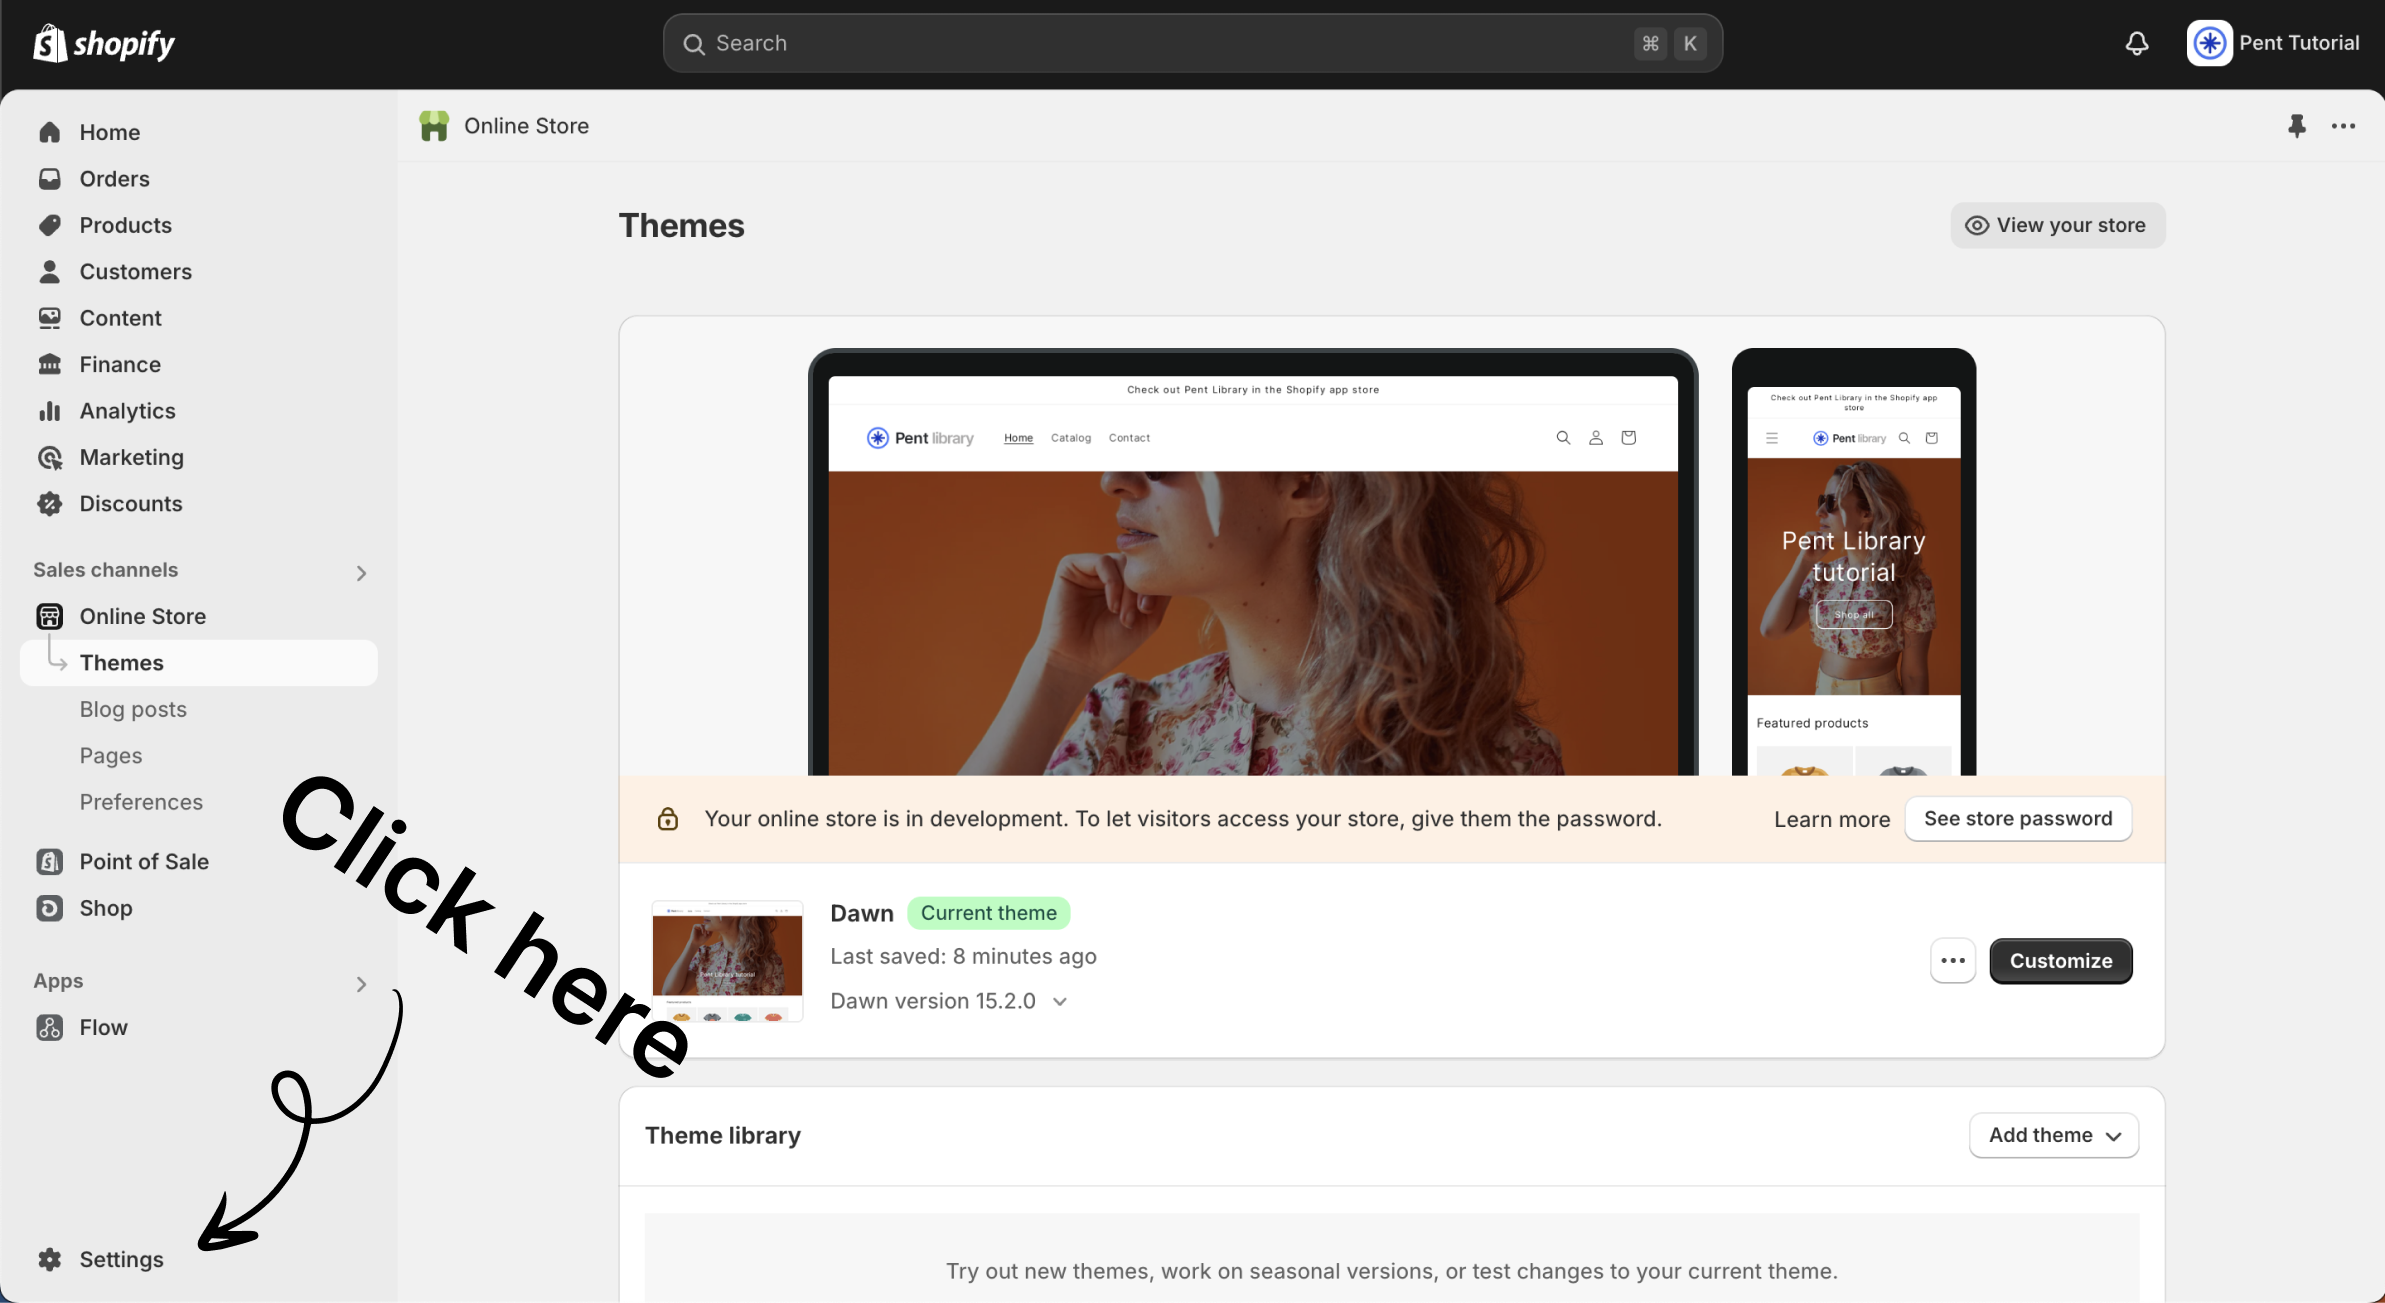
Step 1 - Enter your store settings.
To adjust the shipping rates in your Shopify store, you first need to access the store settings. Simply click the "Settings" button located in the bottom-left corner of your Shopify admin.
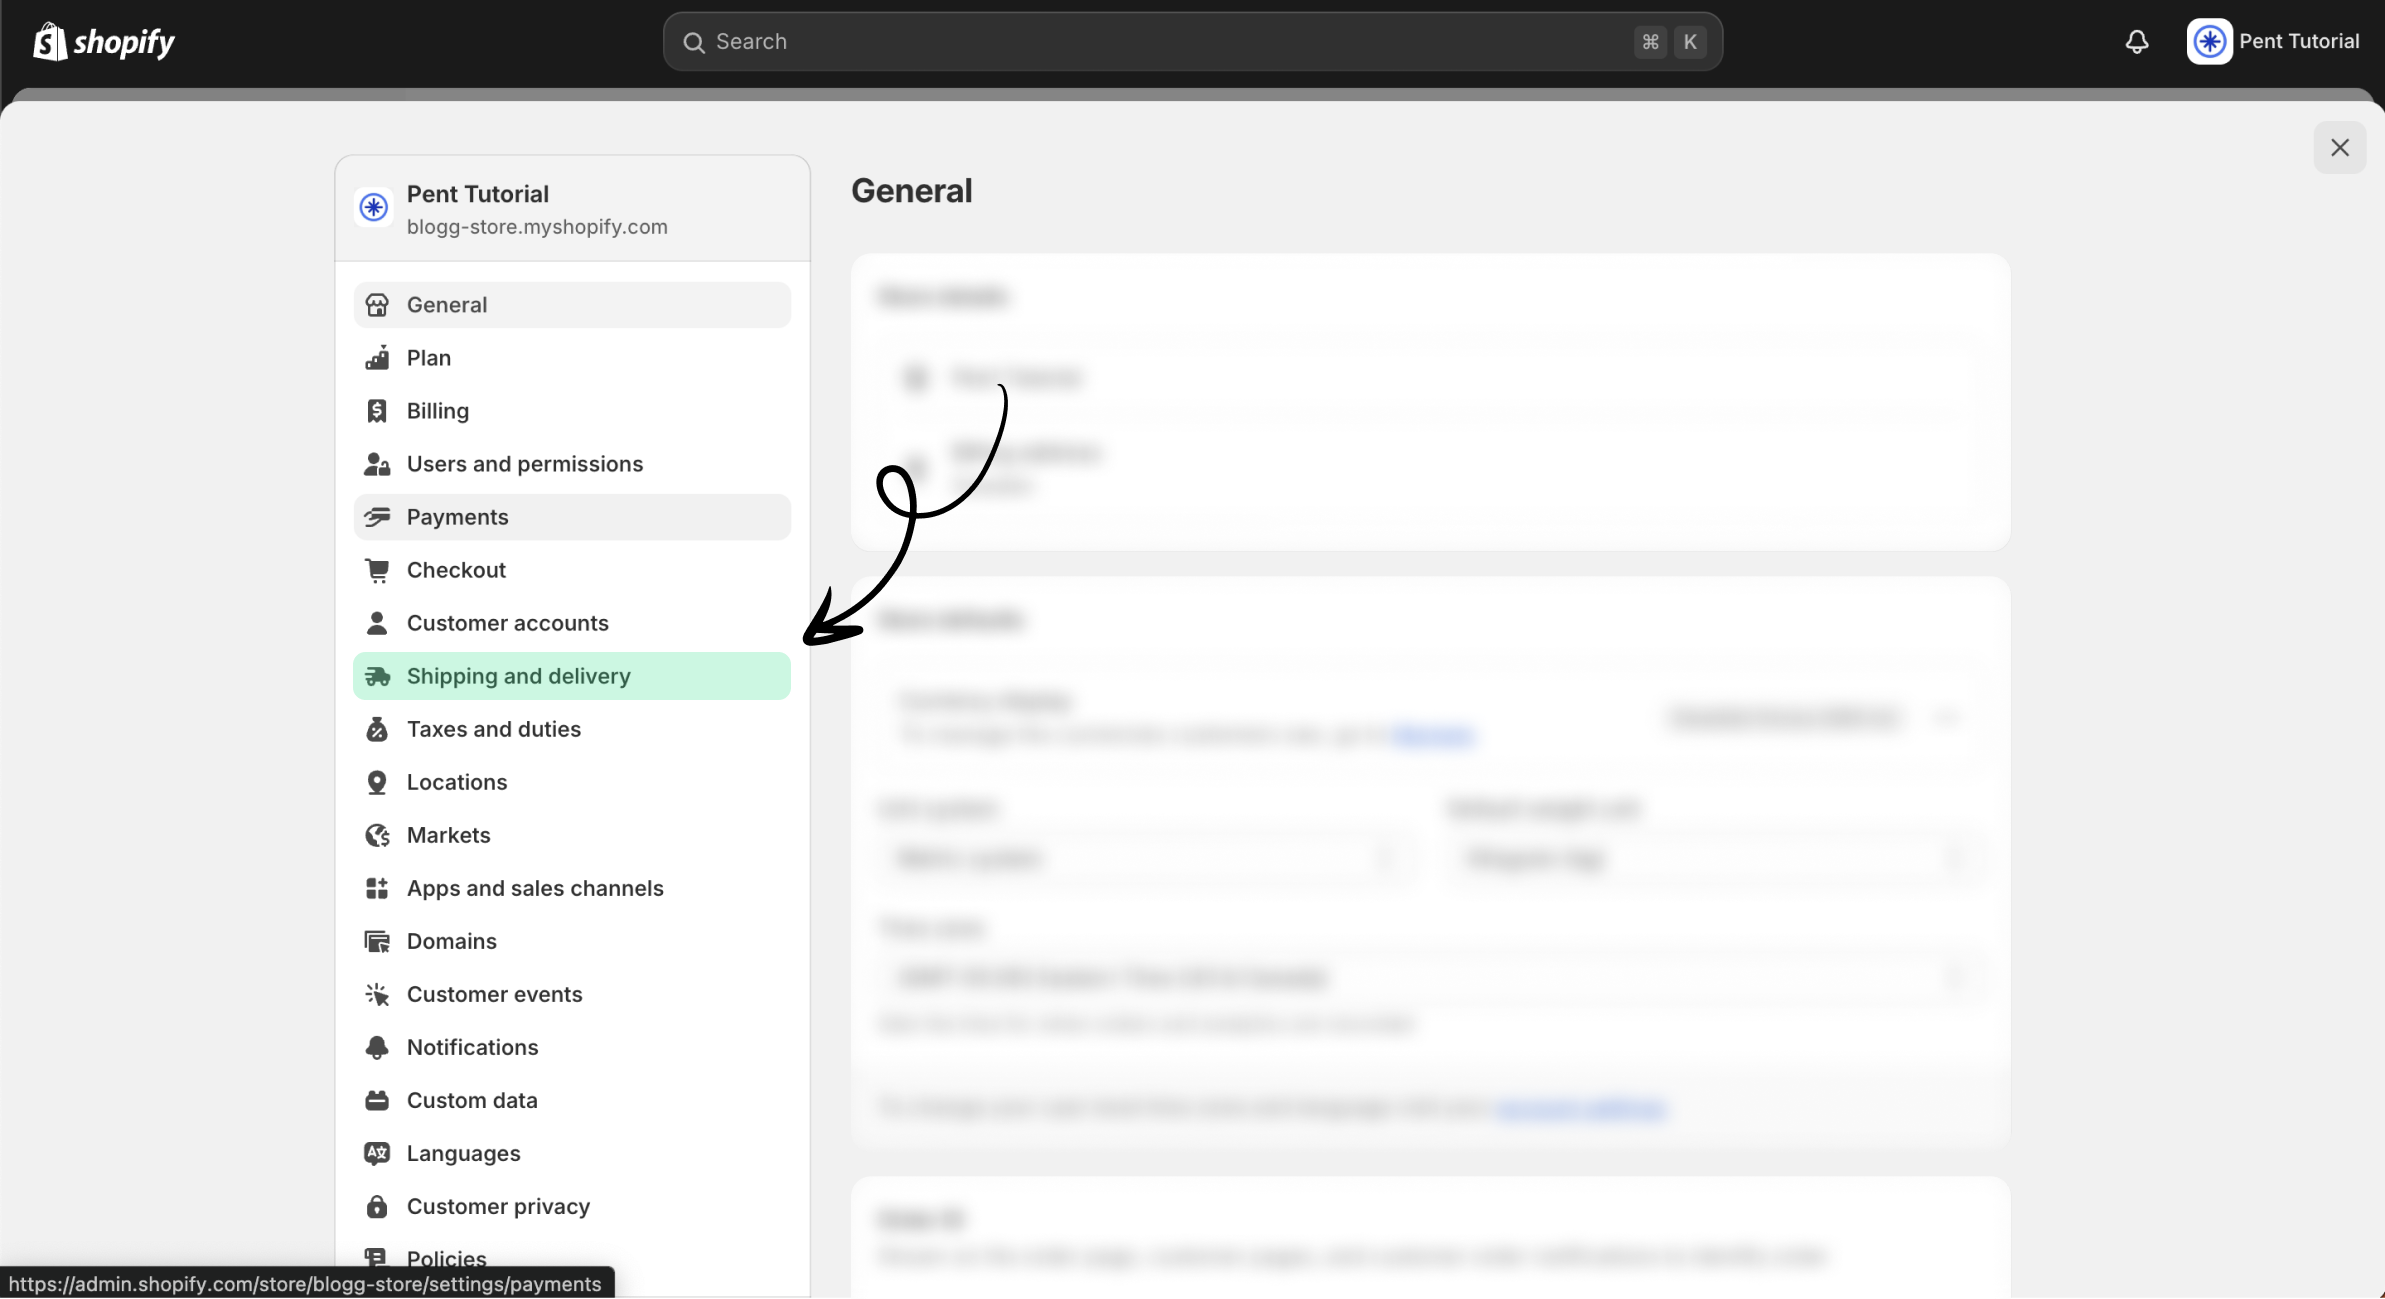
Step 2 - Press "Shipping and Delivery"
Once you've opened the settings menu for your store, navigate to the "Shipping and Delivery" option to access your shipping profiles and adjust prices.
Step 3 - Understanding Shopify shipping
Before we dive into the specifics of changing your shipping prices, it's important to understand how Shopify's shipping system works. This will help you know what to adjust and why each change matters.
These are the shipping areas we will quickly walkthrough now:
- General shipping rates
- Custom shipping rates
General shipping rates:
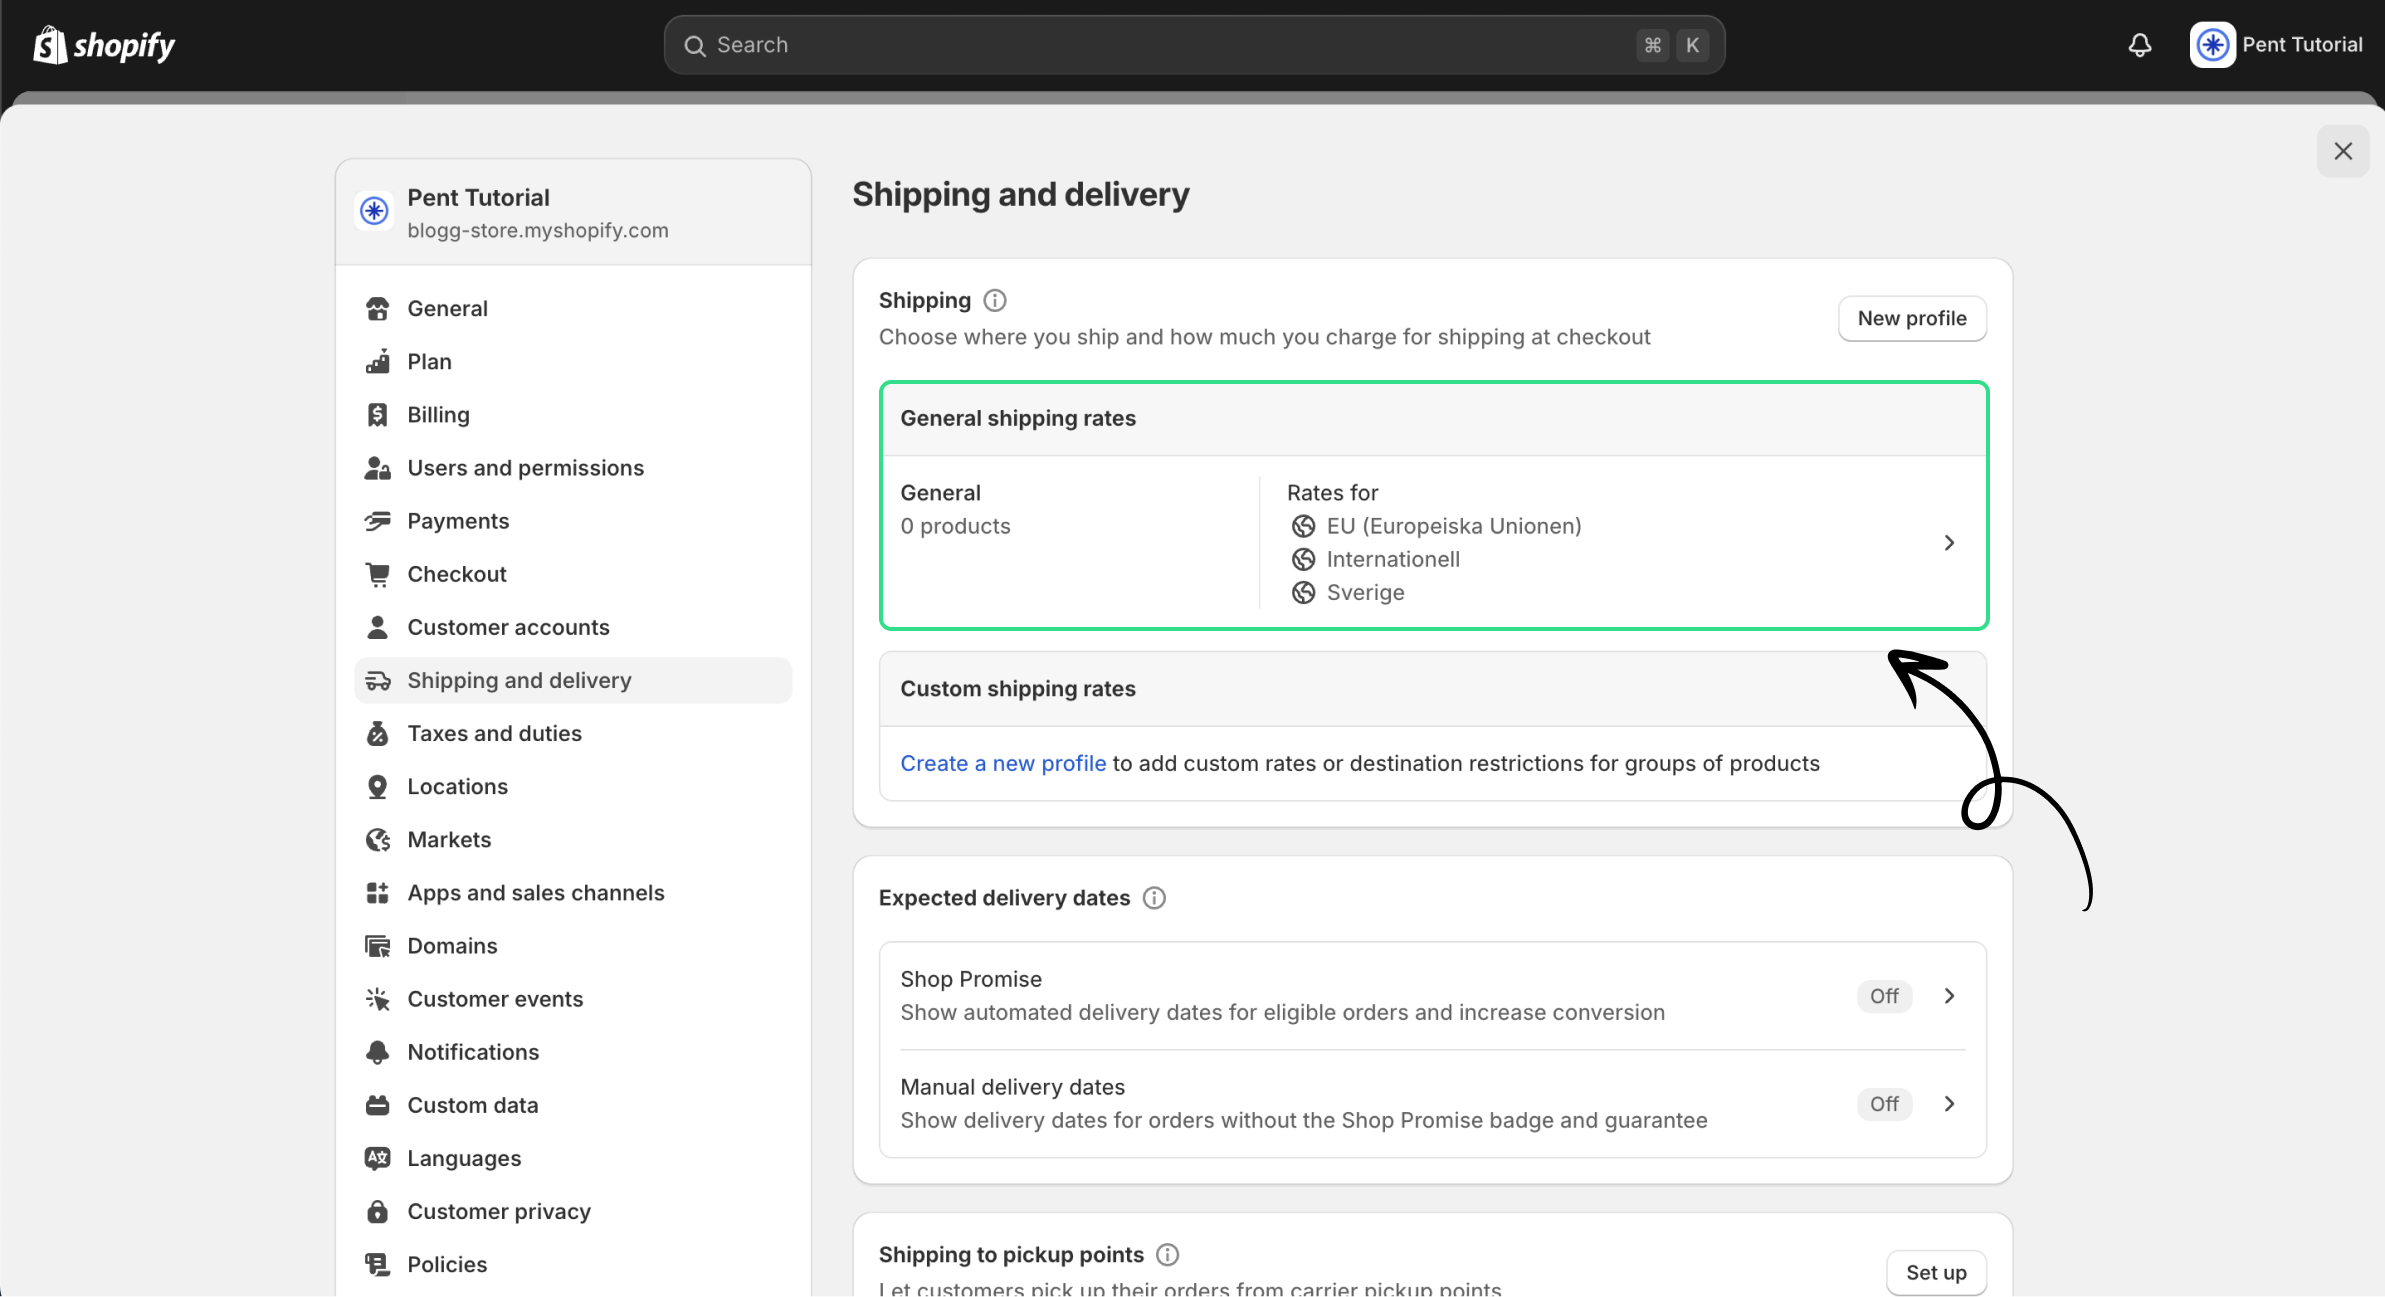
General shipping rates apply to all products and orders unless you create and apply custom shipping rates or profiles. By default, Shopify sets up three standard shipping options.
- One for your country
- One for your region (US or EU etc)
- One for international sales
When you create a new Shopify store, default shipping rates are pre-set. However, you can easily customize these rates to suit your specific needs!
Edit a current shipping rate
To edit one of the standard shipping rates, click on the general shipping rate as shown in the image above. This will open a menu displaying the three default shipping options mentioned above. To make changes to any of these pre-set rates, click the three dots next to the desired shipping rate. Refer to the image below for guidance!
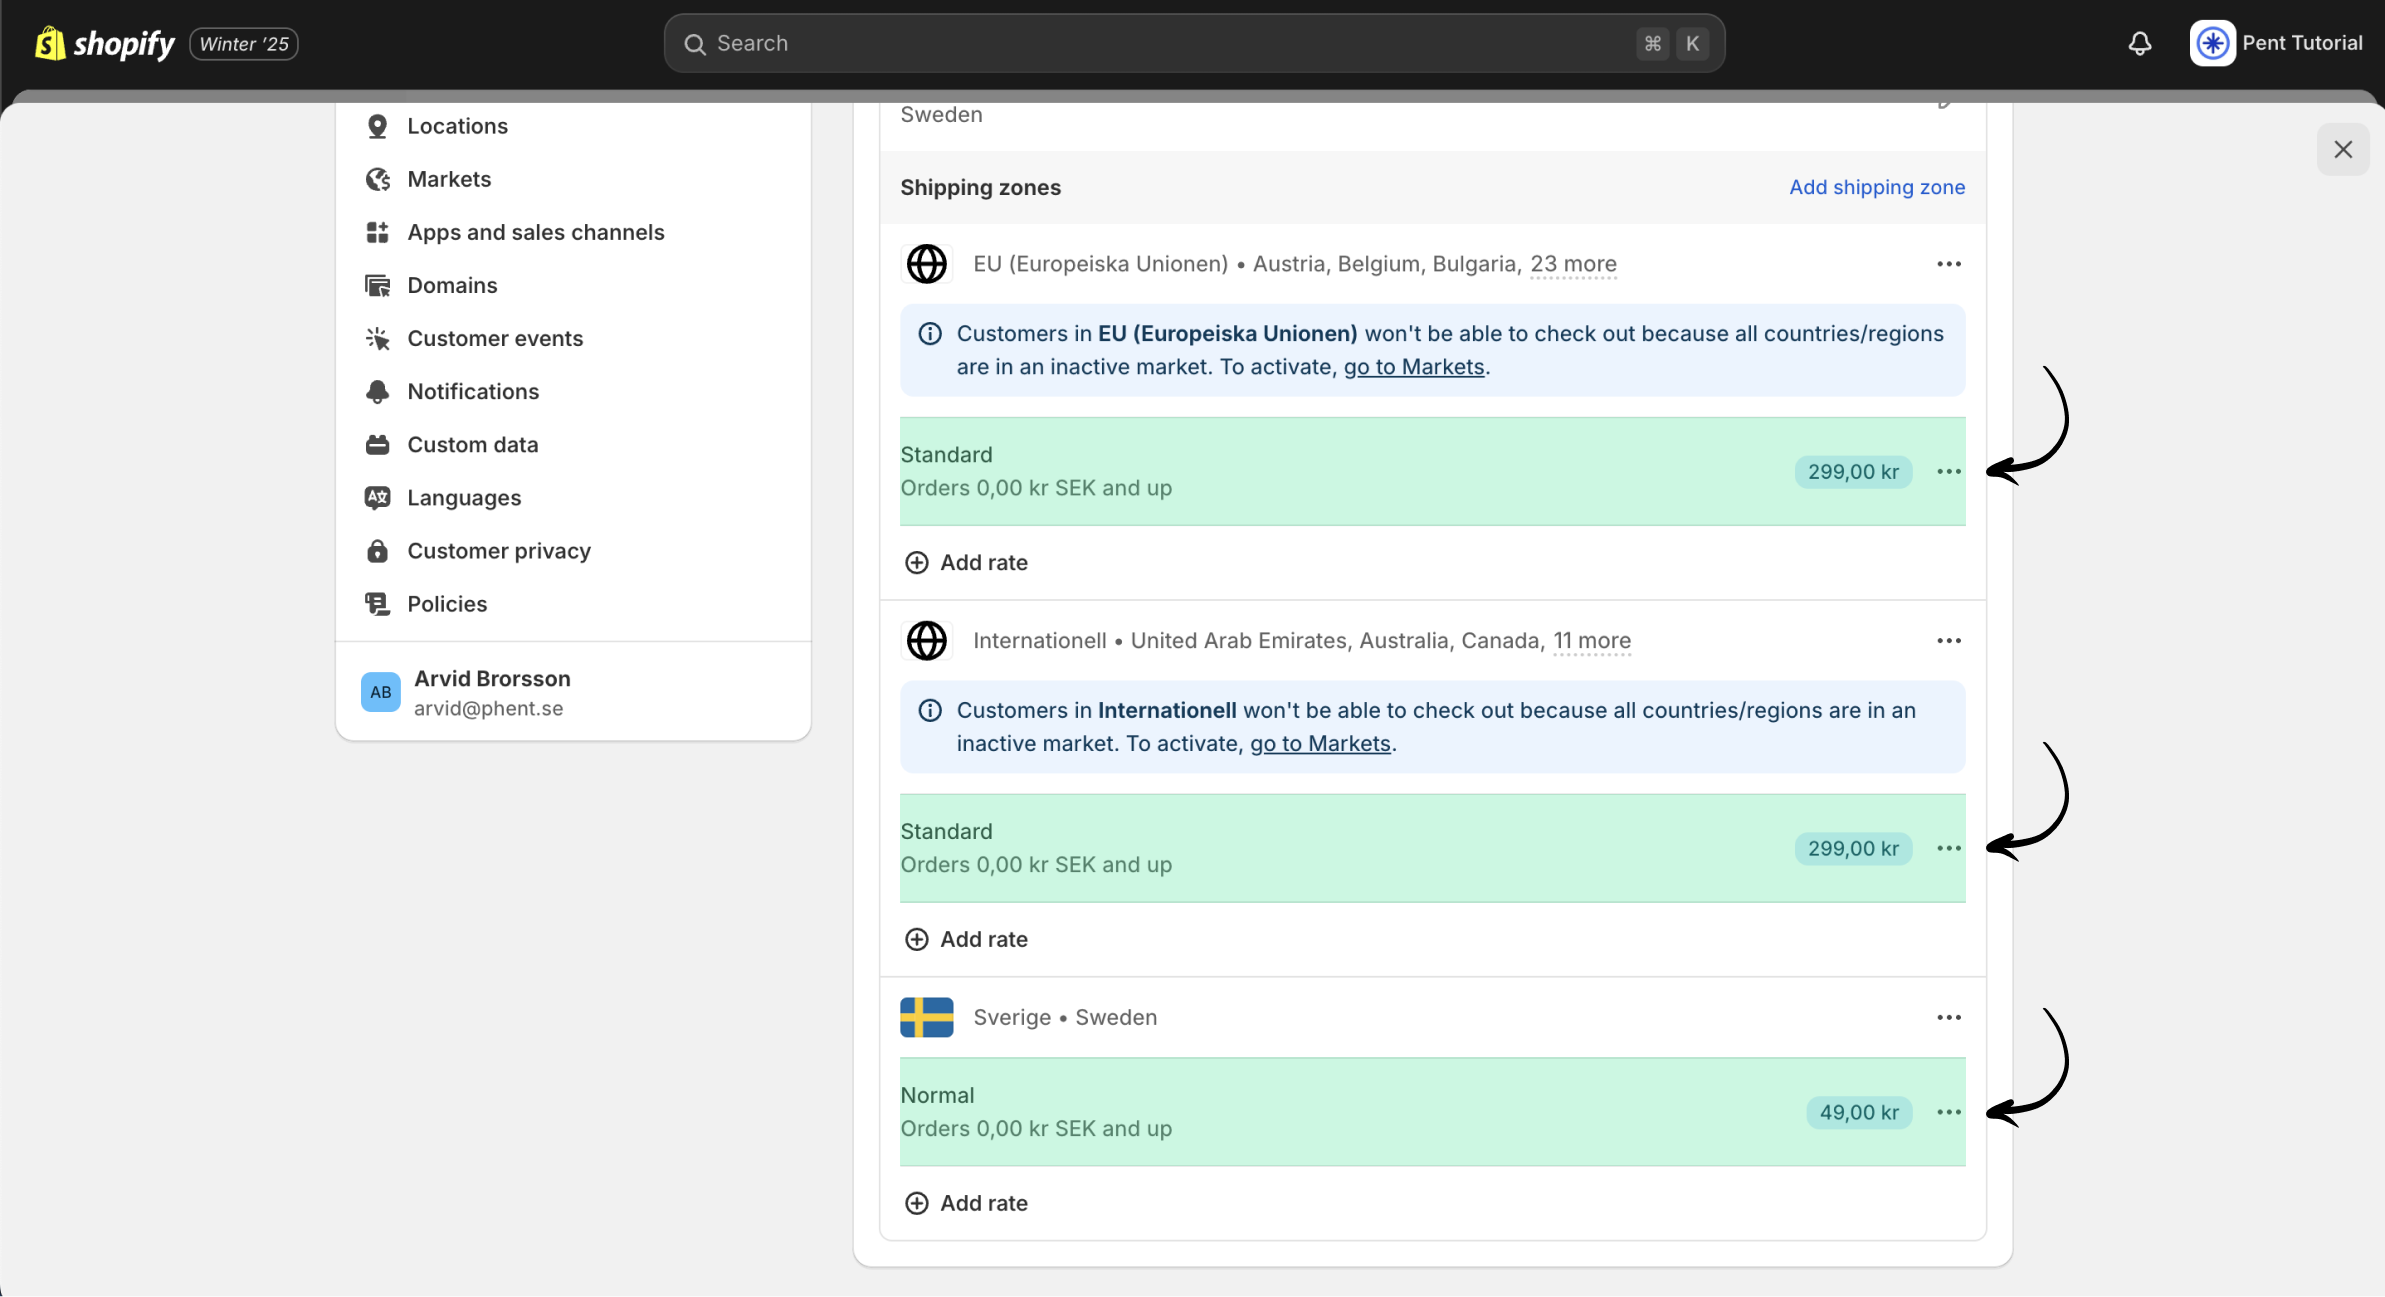
Add rates to a shipping option
If you instead want to create a new shipping rate for one of the three option you press the Add rate button located under the default rate. See image below for reference.
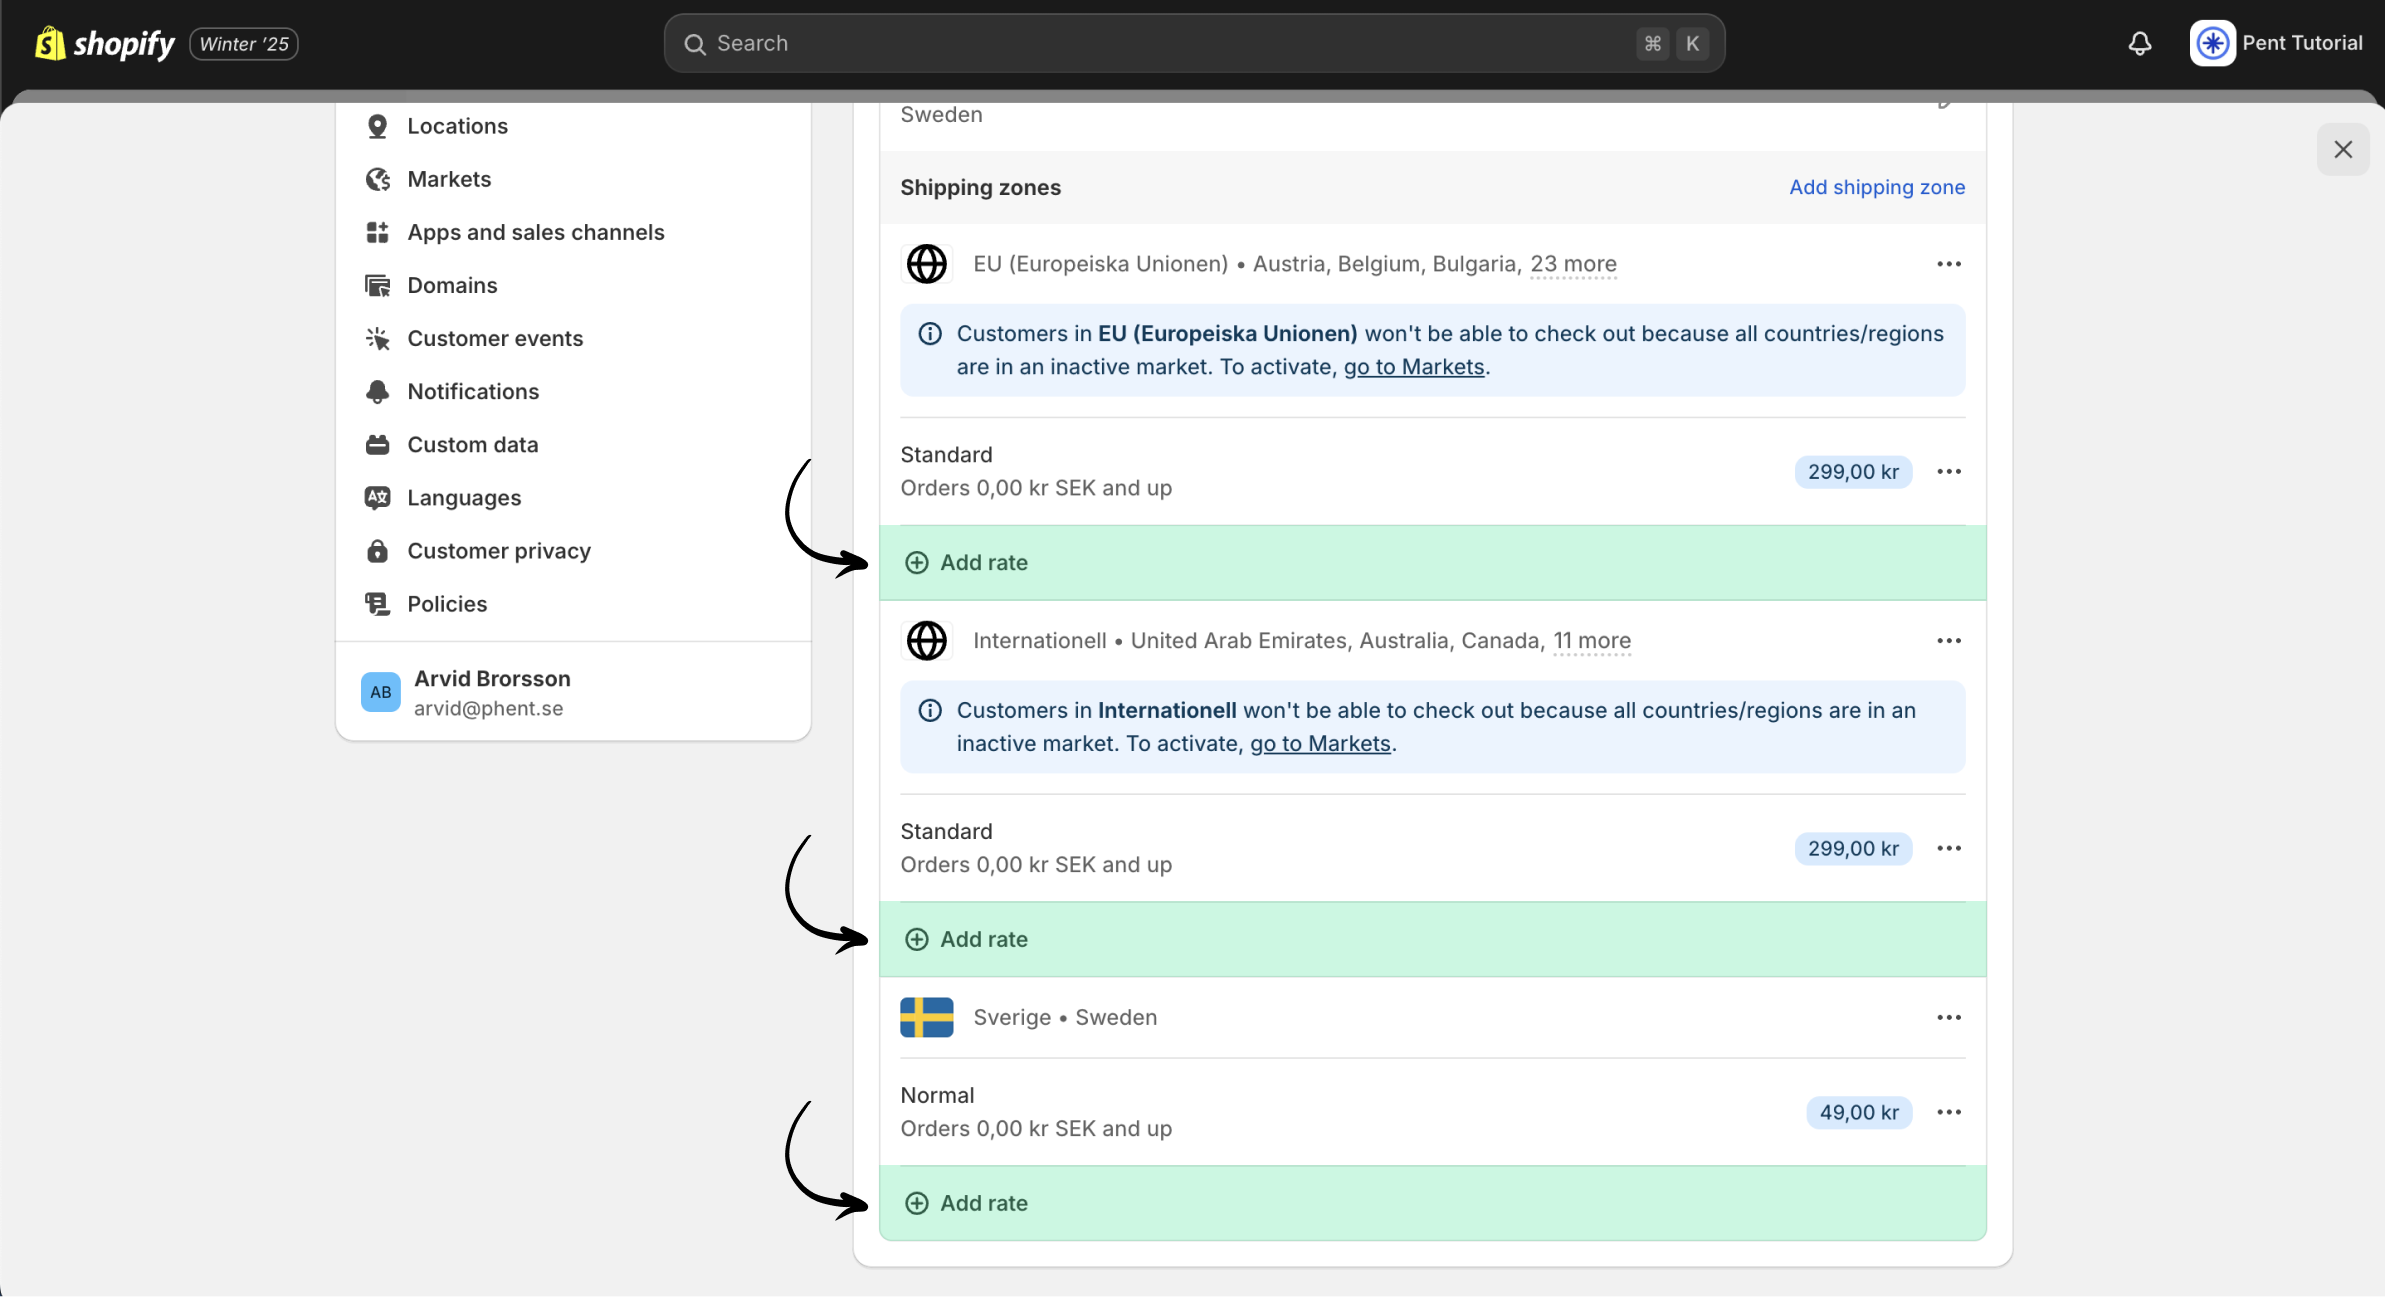
Adding a new shipping rate
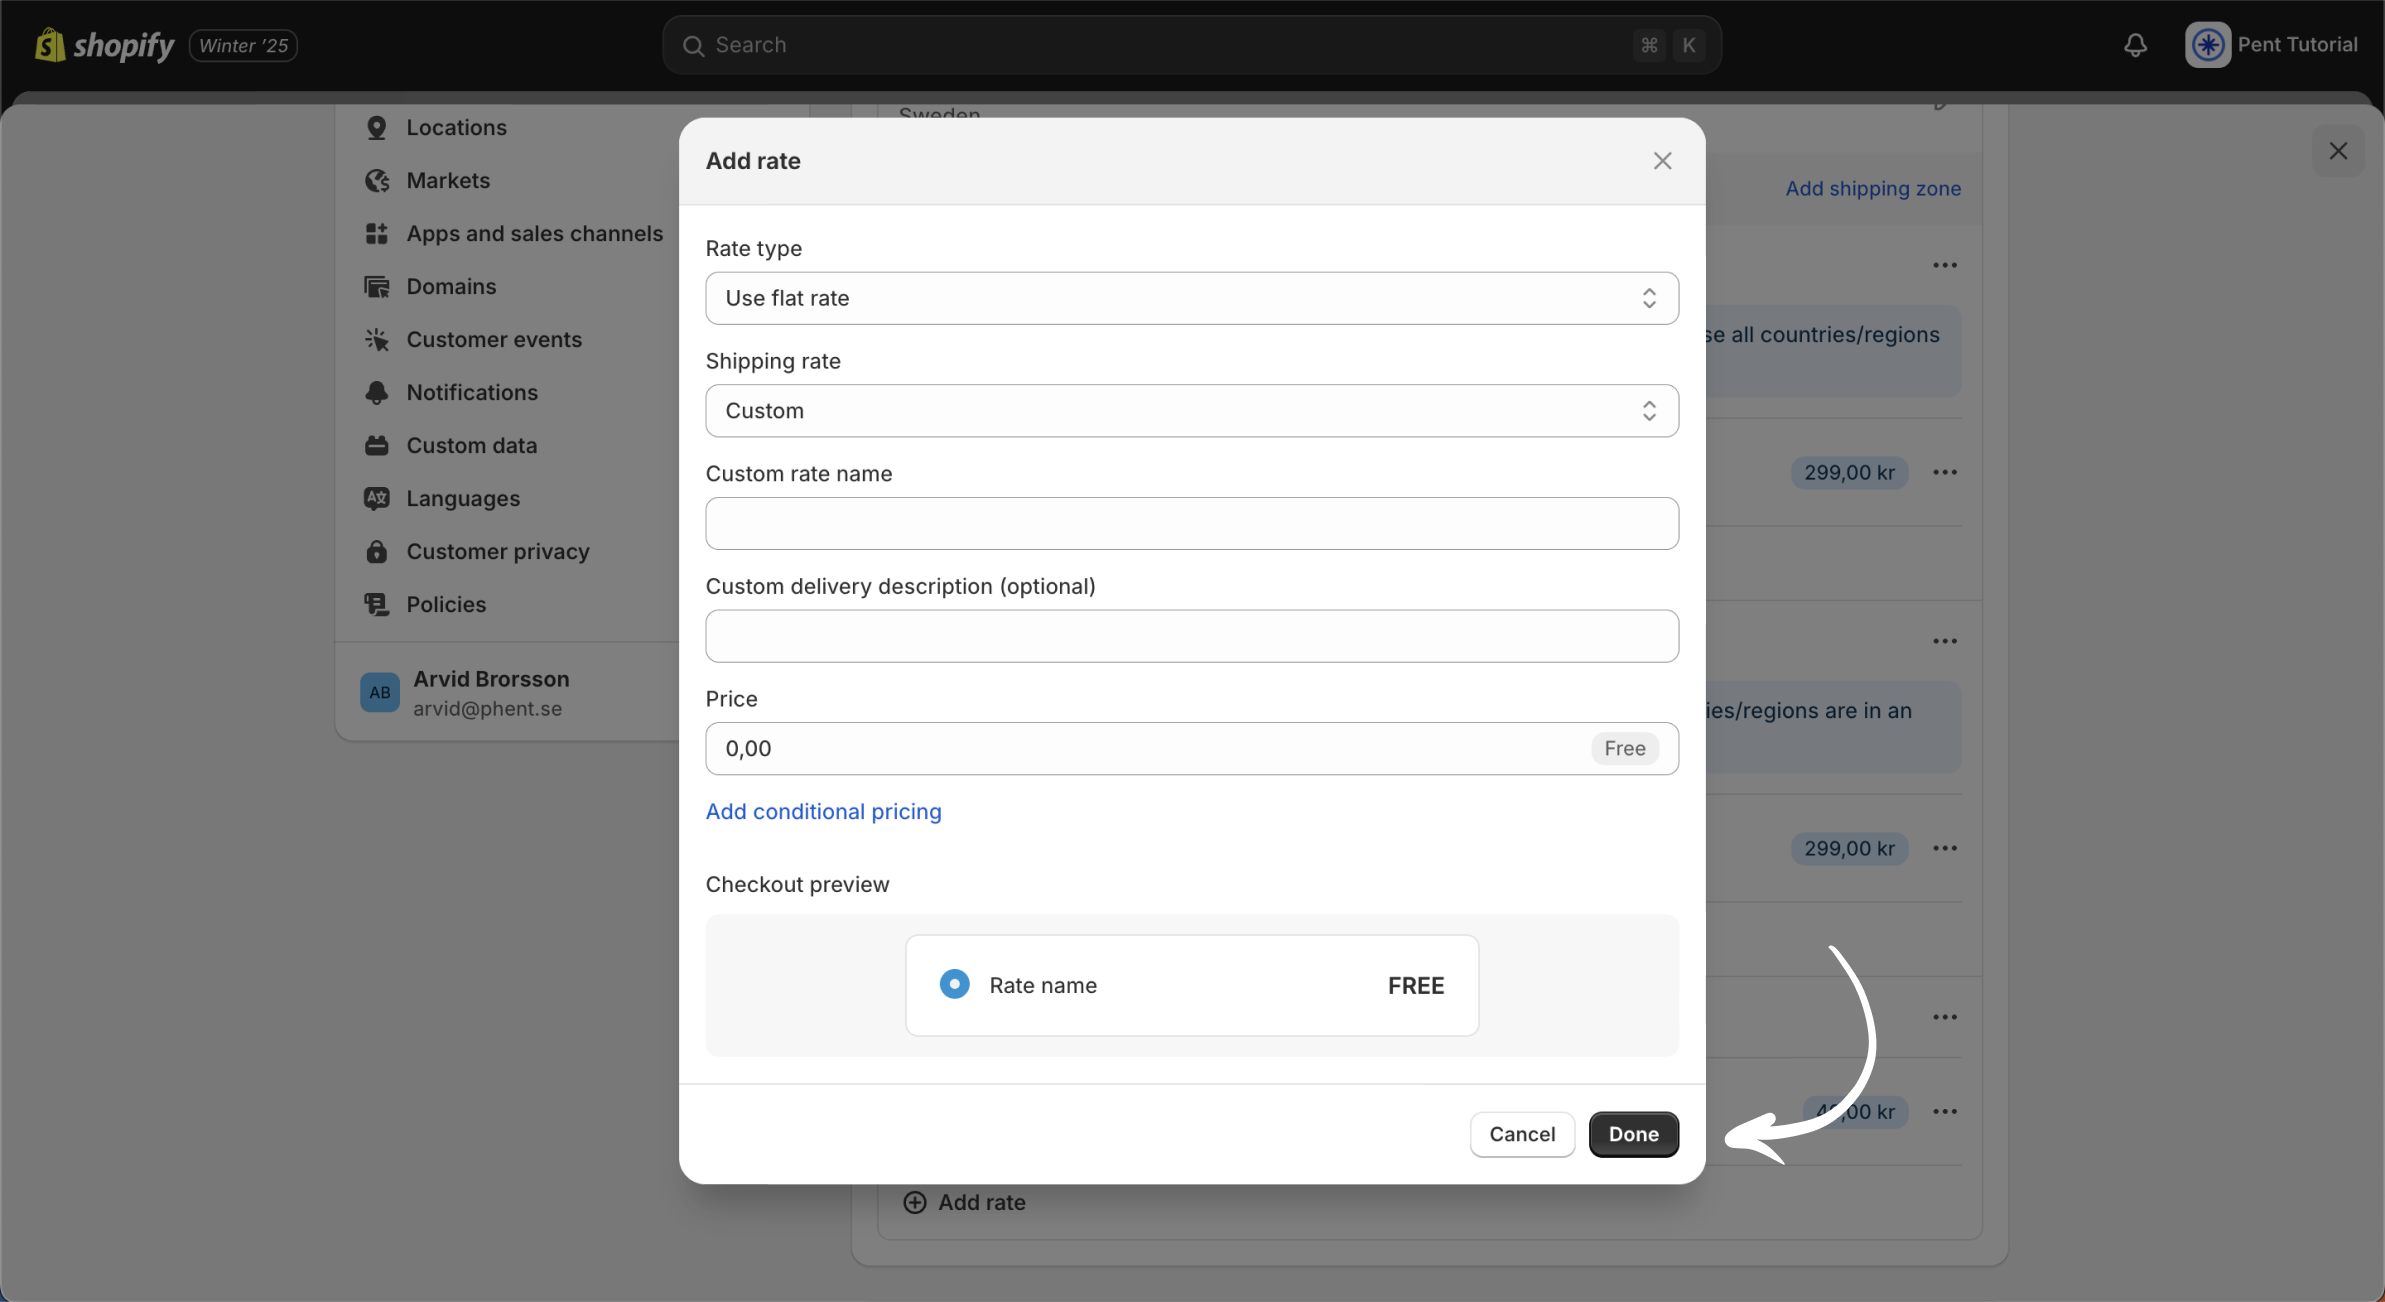
After clicking "Add rate," a popup modal will appear with a form that you need to fill out for your new shipping rate. Below, I’ll explain the different options and what they mean:
Rate type:
The rate type you have two options:
- Flat rate
- Carrier or app calculated rates
The flat rate allows you to have full control over your shipping price within Shopify, while Carrier or app-calculated rates are used when a third party is connected to handle the shipping calculations for you.
Shipping rate:
There is only one option here and is pre set on custom.
Custom rate name:
In this field, enter the name of the shipping rate you're creating. This name will appear to customers during checkout, so make sure it’s clear and descriptive!
Custom delivery description:
In this field, you can provide additional information about the shipping option if needed. This description will also appear to the customer, so make sure it’s clear and helpful.
Price:
Here, enter the shipping price that you believe works best for your business’s finances while remaining reasonable for customers. Choose a rate that aligns with your goals without discouraging potential buyers.
Checkout preview:
Here, you can preview all the changes you've made to see how the shipping rate will appear to your customers at checkout.
Save the new shipping rate
Once you've filled out the new shipping rate form to your satisfaction, click the "Done" button to save your changes. See the image below for reference.
Custom shipping rates:
Now that we've covered the general shipping rates and how to edit or create new ones, let's dive into custom shipping rates. We'll explore what you can do with them and how to use them for different use cases!
What are custom shipping rates used for?
Custom shipping profiles are designed to handle specific use cases where the standard shipping options don't meet your needs. This could include products that require specialized shipping for different reasons.
Setup a custom shipping profile
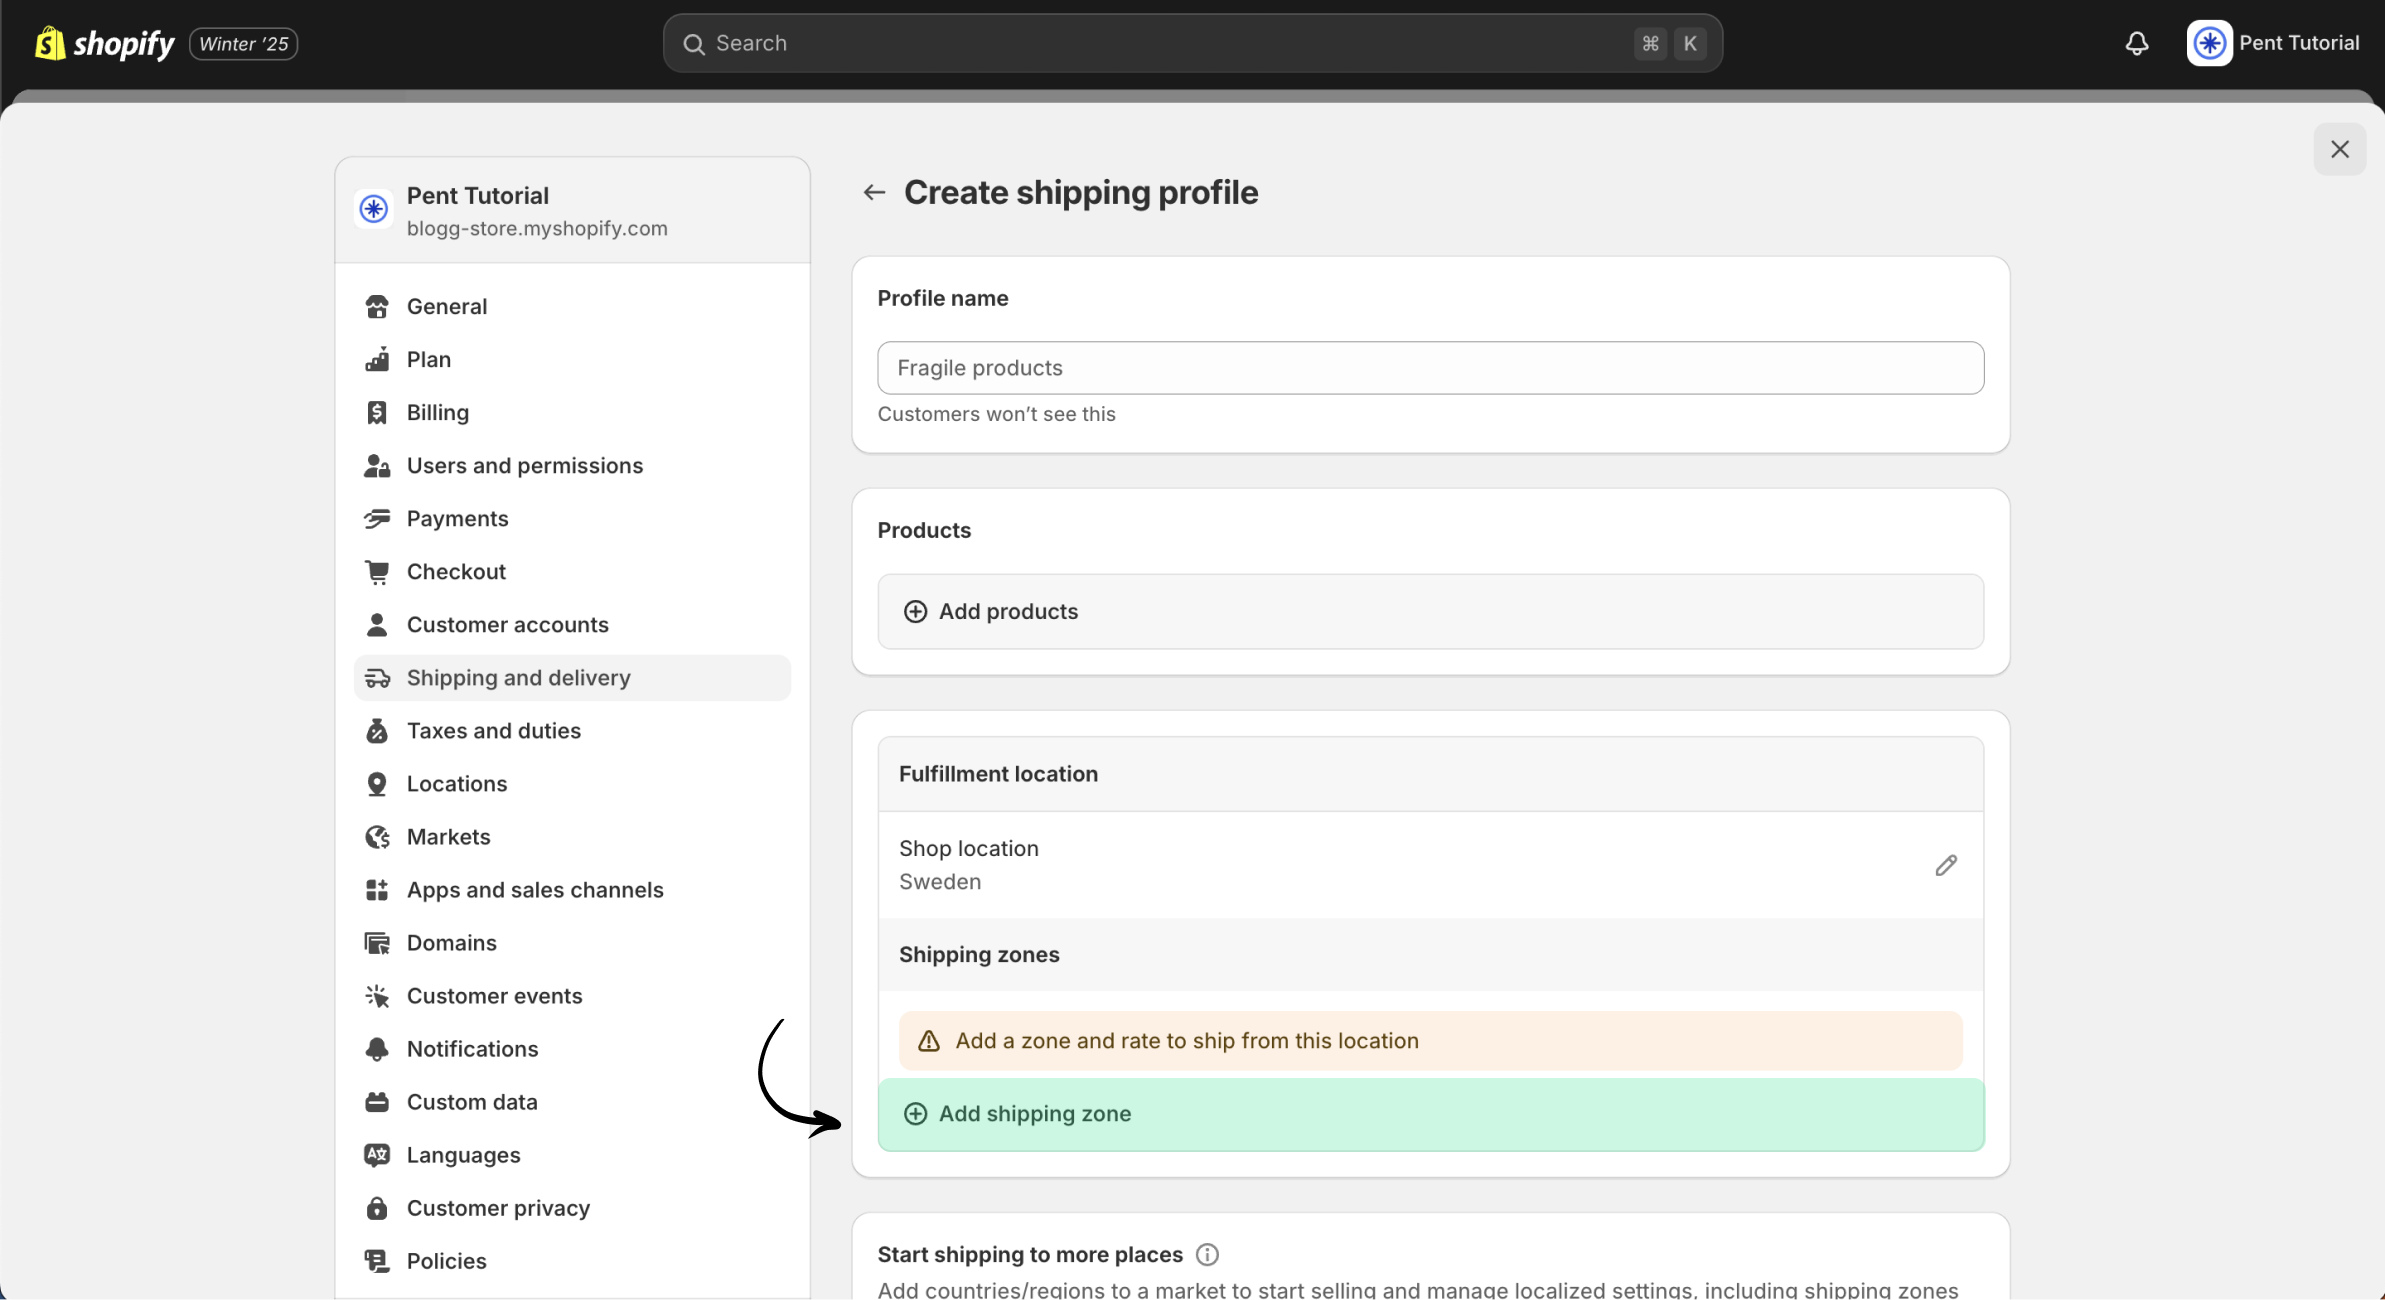
When creating a custom shipping profile, you'll need to give it a name. Although your customers won’t see this name, choose something descriptive so you and others working on the store can easily identify the purpose of the shipping profile.
Next, add the products that should be included in this custom shipping profile. For example, if the profile is for fragile items, you would add all the fragile products that need special shipping conditions. Below you can see both of these fields highlighted.

Add a shipping zone
To apply the custom shipping profile, you need to designate the shipping zones it will cover. Click on "Add shipping zone" and select the countries you want the profile to apply to and name the zone. Refer to the image below to see where to access the country selection modal.
Add a custom shipping rate
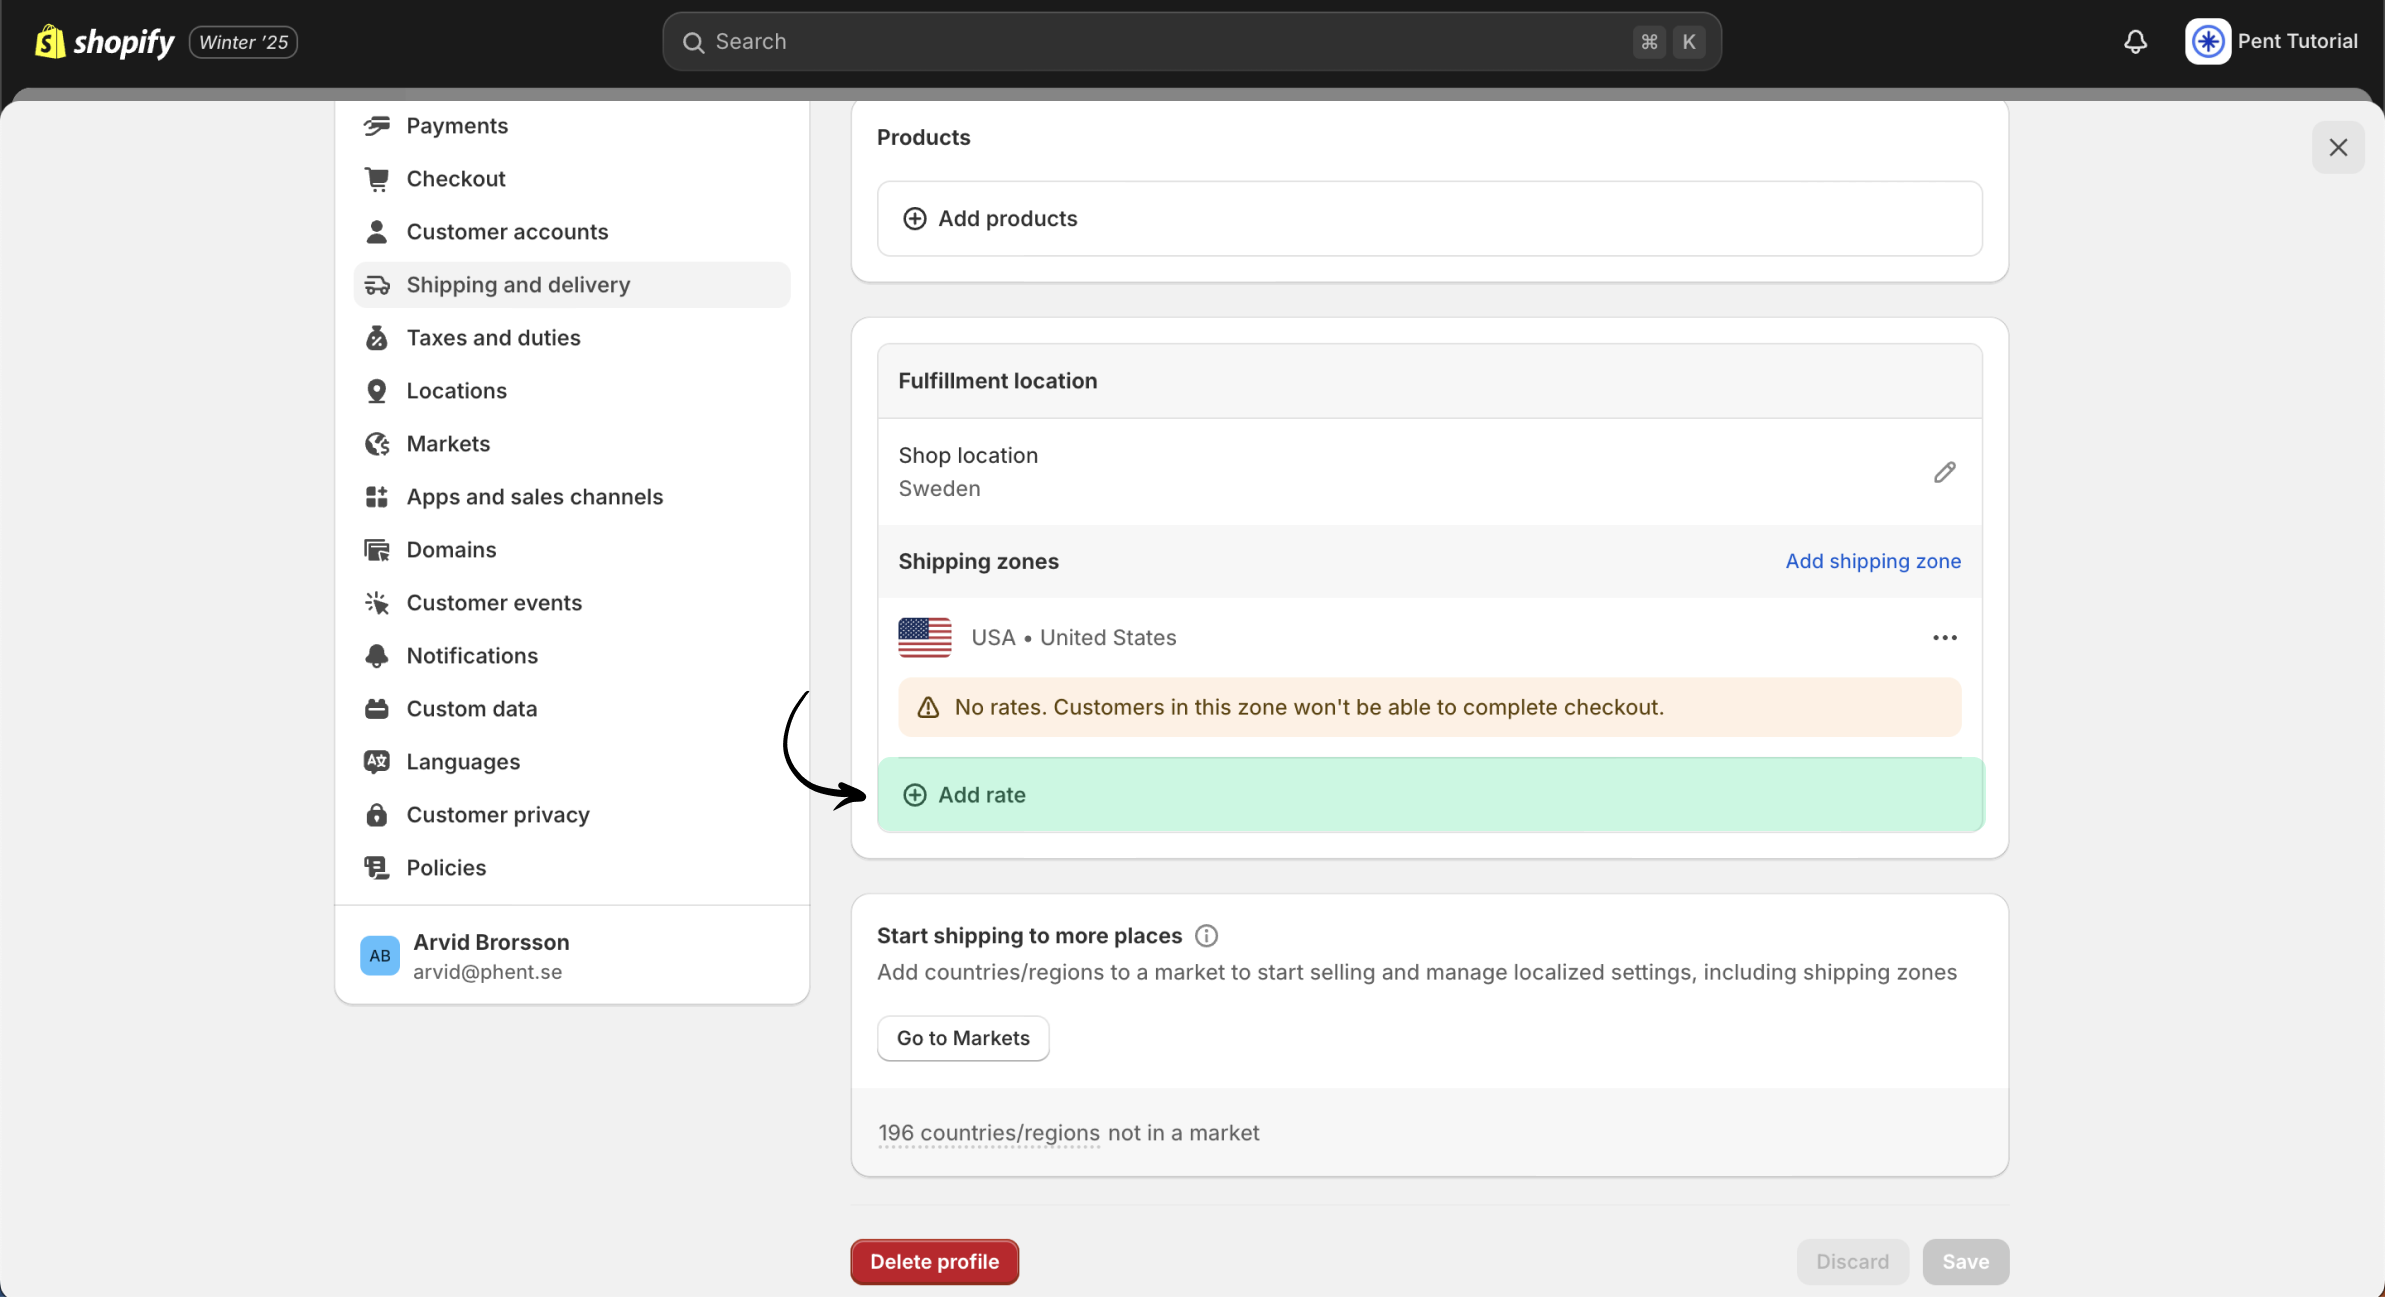
After naming your shipping zone and selecting the countries or regions it should cover, you can now set the custom shipping rate for that zone, just as you did previously. Refer to the image below to see where to access this option.
Step 4 - Changing the rates to fit your business
Now that you know some general information about the different shipping profiles and how to use them you can now make a custom setup that fits your business needs and makes sense for your customers!
Conclusion
Hopefully this guide helped you understand the Shopify shipping a bit better and that you can edit your shipping to fit you business!
